• Skip to main content

Davton

Outlook development specialists

  • Home
  • About Davton
  • Blog

Bespoke Development

Using Auth0 Integration with an Outlook Plugin

May 7, 2017 by davton

Davton have implemented a number of different authentication mechanisms as part of our work integrating SAAS applications with Outlook and Office 365, including oAuth, oAuth2, single sign on using federated Active Directory, and simple username and password. Recently we were asked by a customer to use a third party service called Auth0  which provides ‘authentication services’ as a service.

This article describes how we used Auth0 authentication with an Outlook plugin. (Note: Davton is not affiliated with Auth0 in any way)

Why do we need Auth0?

Davton integrates SAAS applications with Outlook. In this case, the Outlook plugin would upload to the SAAS application, the email address of the sender of specific emails. This information is communicated via an API – and the API requires a protocol to allow the Outlook plugin to be authenticated. One option would be to build in a username/password mechanism into the SAAS application. An easier solution is to allow the user to be authenticated by a third party application. That application is Auth0.

What is Auth0?

Auth0 is a third party (freemium) service which abstracts how users authenticate to applications or to systems. Developers can use the Auth0 authentication service for any programming language and on any stack to authenticate users to connect with the application. There are several methods that developers can use to connect users to the application using Auth0. They include.

  • Social network logins: Google, Facebook, Twitter, and any OAuth2, OAuth1 or OpenID Connect provider.
  • Custom credentials: username + passwords
  • Passwordless systems: Touch ID, one time codes on SMS, or email
  • Enterprise directories: LDAP, Google Apps, Office 365, ADFS, AD, SAML-P, WS-Federation, etc.

Figure 1 shows the mechanism of how Auth0 connects users with the applications.

Auth0 Mechanism

Auth0 provides Software Developers Kits (SDKs) for all major platforms such as .Net, PHP, Python, Java, NodeJS, android, IOS etc. It’s very simple and easy to create the integration to authenticate users to connect with applications using Auth0.

Auth0 Account

Before we begin development, it is necessary to create an account on the Auth0 service to use Auth0 authentication.We will need the details of this account later.

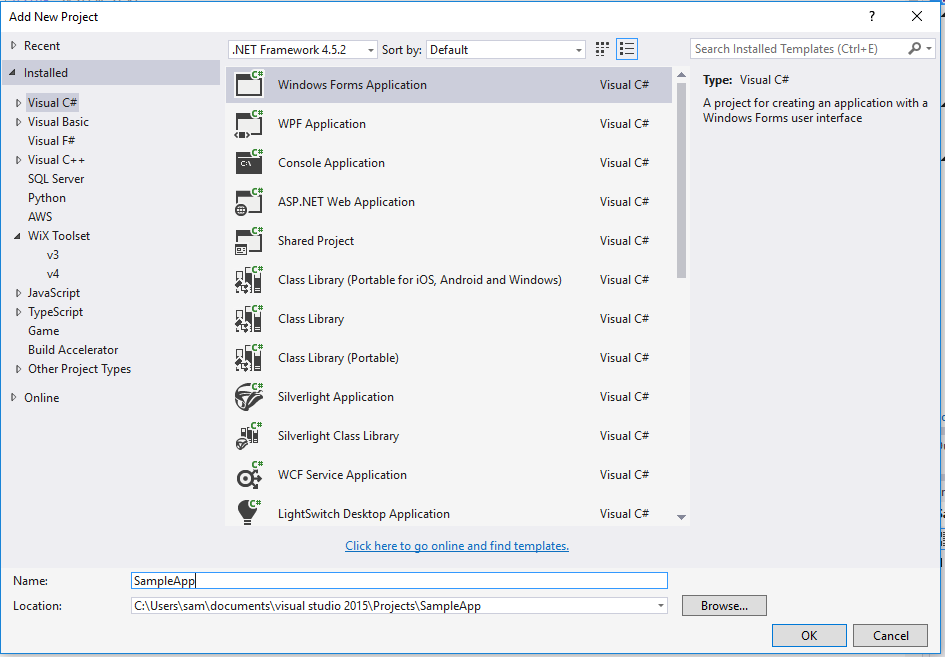
Creating a sample Outlook plugin which integrated with Auth0

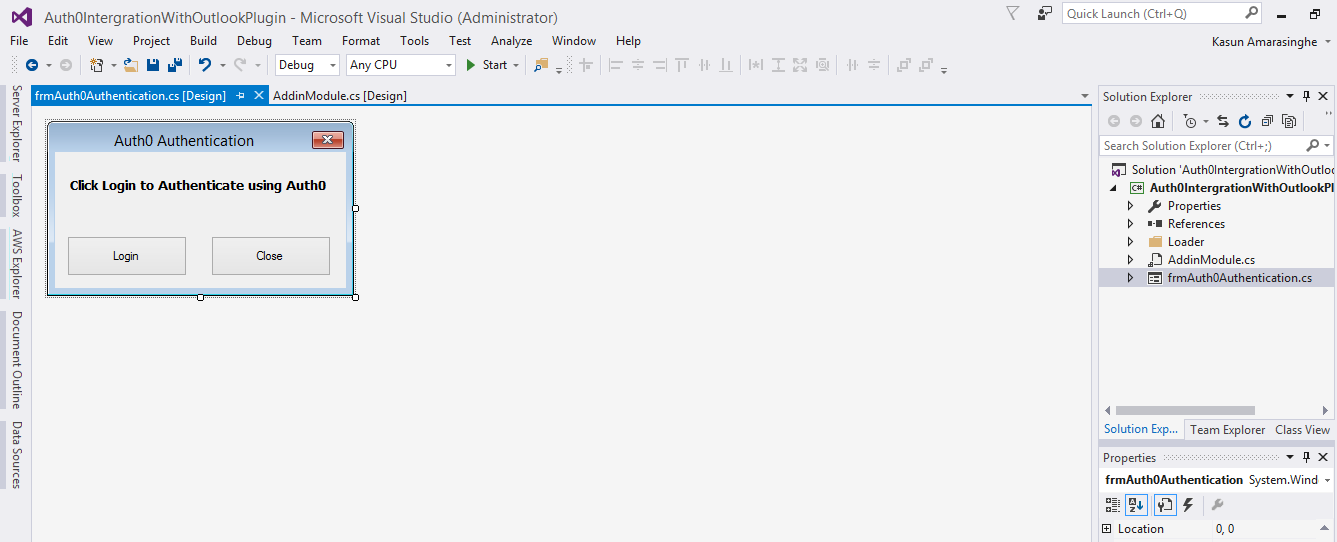
This article describes how to integrate Auth0 in an Outlook plugin by creating a sample Add-in for Outlook. The details of how to create the add-in are beyond the scope of this article, so we will start from the point of creating a windows form which is displayed when we want the user to logon to the service.

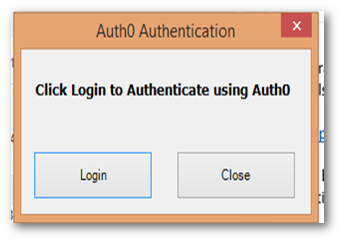
Below we can see the Windows form which has been created to allow the user to login.

Windows Form

Adding Auth0 assembly for windows forms to the plugin project

After creating the windows form design we need to add the Auth0 assembly to the plugin project to create the Login button functionality.

Go to “Tools > NuGet Package Manager” and click “Manage NuGet Packages for Solution”. Then click on Browse and type “Auth0” in the search text box and select “Auth0.WinformsOrWPF” from the list of assemblies in search results (figure 8).

Install the assembly to the sample project.

Install the Assembly

After that double click on the Login button to add the functions to the Login button. – The picture below shows the code snippet for the Login button functionality which was given by Auth0.

 Code snippet

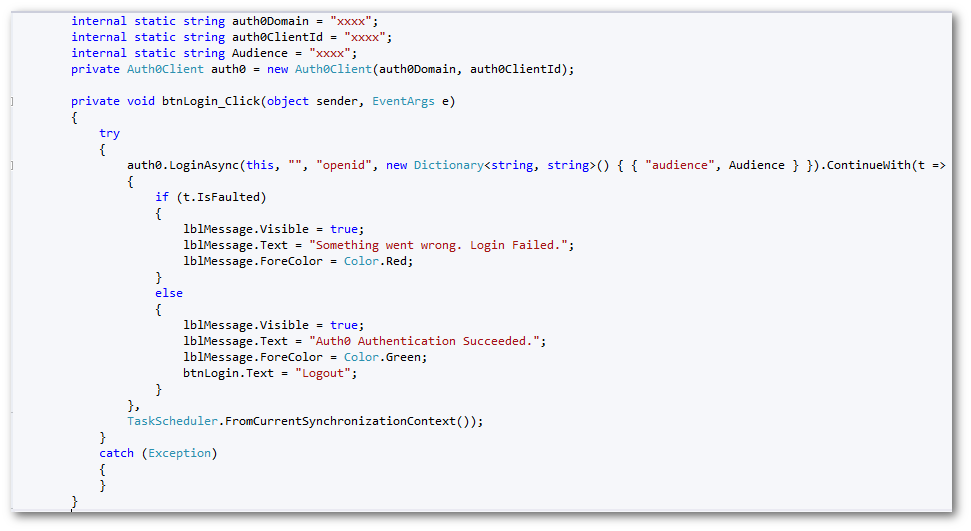
You can find further details on the auth0 web site here: https://auth0.com/docs/quickstart/native/wpf-winforms

Strongly-named key

At this stage you will need to refer to the account information for your Auth0 account. The  auth0Domain and auth0ClientId will be required in our code.

Important: Auth0.WinformsOrWPF requires a strongly-named key. Without a strong key for this assembly Outlook will fire an exception when we click on the ribbon button we created.

Please refer to “https://blog.devoworx.net/2014/03/13/signing-a-strong-key-to-an-existing-dll-that-you-dont-have-the-source-to-it/” for more information on how to sign a strongly-named key for Auth0.WinformsOrWPF assembly.

Add the Auth0.WinformsOrWPF assembly reference to the sample project after signing a strongly-named key for Auth0.WinformsOrWPF assembly.

Running the sample Outlook Plugin

When we compile and run our sample plugin, at the appropriate point, the plugin will display our windows form with the login request.

Click login to Authenticate using Auth0

Now we can click on the Login button to authenticate using Auth0 login form as follows.

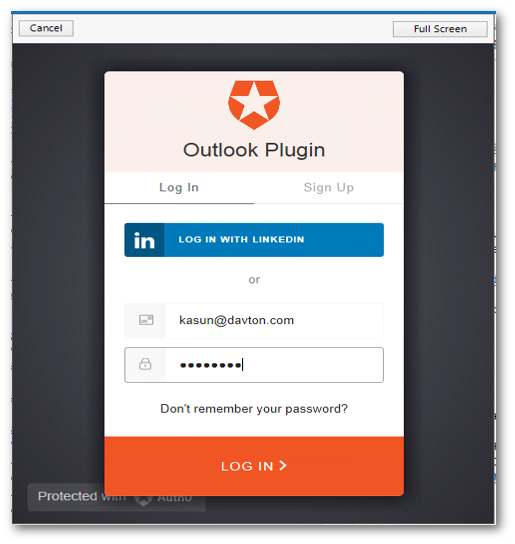
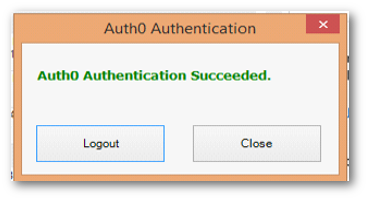
We can either login using our username and password or we can sign up and then can login to the application using Auth0 authentication. Also we can login using our LinkedIn profile login too. All the validations are done in this authentication form of Auth0. We don’t need to do validations by ourselves. So if we logged in successfully we can see the following message in our windows form as follows.

Authentication Succeeded

Summary

So using these steps we can use Auth0 authentication for our Outlook plugin. One of the most important things is to sign a strongly-named key for Auth0.WinformsOrWPF assembly, otherwise we can’t implement Auth0 authentication in Outlook.

Finally I hope this article will be helpful for the developers who implement Outlook plugins using Auth0 authentication.

Written by Kasun Amarasinghe May 2017

How to pass Custom Actions to a WIX Installer using command line arguments

May 1, 2017 by davton

It is often desirable for an installer to be provided with specific data at the time of the installation. For example to supply a user name, password, license string etc. Passing command line arguments while initiating the installation process allows us to do this. This article gives you a detailed description about how to pass data to custom actions in a WIX Installer using command line arguments.

The installation process can be controlled using custom actions. Custom actions can be dynamic linked libraries, Visual Basic scripts or JavaScript files. A custom action written in C# will generate a dynamic linked library file (DLL).

Why use Custom Actions?

The installer provides many standard actions that execute during an installation. However, there may be times where your installation needs expanded functionality. In these cases, custom actions let you extend the capabilities of standard actions. We can use custom actions for the following scenarios.

  • Launch an executable during installation that is installed on the user’s machine or that is being installed with the application.
  • Call special functions during an installation that are defined in a – (DLL).
  • Use functions written in the development languages Microsoft Visual Basic Scripting Edition or Microsoft JScript literal script text during an installation.
  • Defer the execution of some actions until the time when the installation script is being executed.
  • Add time and progress information to a ProgressBar control and a TimeRemaining Text control.

Creating a sample project.

In this sample project, we tell the Wix Installer to use custom actions to execute an .msi with command line arguments. The example will create a sample installer for a Windows Form Application.

Start Visual Studio and go to “File->New Project” under the installed section select Windows Forms Application [Figure1].

Create a new project

Figure 1

Create an Installer for the application

Right click on the solution and “Add->New Project“.  Under Wix Toolset select Setup Project and add a new one. To install Wix Toolset, go to http://wixtoolset.org/releases/ download, setup and install [Figure2].

Add New Project

Figure 2

In the CustomActionSetup project, right-click on the References node and choose Add Reference.

Navigate to the Projects tab, click on the SampleApp project, and click the Add button, and then press OK [Figure3].

Set Reference

Figure 3

Create a Custom Action for the application.

Once we’ve created our setup project, we’ll need to add a C# Custom Action Project to our solution (you can see this project template option in the below screenshot as well).

To create a custom action, right click on the solution and “Add->New Project“. Under Wix Toolset select a “C# Custom Action Project” and add a new one [Figure 4].

 Create Custom Action

Figure 4

Here is the final Solution [Figure 5].

Figure 5

Edit Product.wxs in Wix Setup Project

After creating the setup project you’ll have a Product.wxs file that defines your setup. In the Product.wxs file, we can define custom actions and properties which are sent through the command line.

  • Define two properties “LIC” and “NAME”. See more on the Property Element in Wix here:

http://wixtoolset.org/documentation/manual/v3/xsd/wix/property.html

  • Binary tag a link to the DLL. Here you will need to give a source location for the dll with any unique ID value. When we build the installer, a custom action project (.CA.dll) is created in the bin folder.
  • In the CustomAction tag, you need to define which custom action you are using. In here refer to the “GetArguementValues” custom action and add the Binary Id to the BinaryKey property.
  • After that define the InstallExecuteSequence for a given custom action. Here specify in which step of the installation the custom action should be executed. See more on the InstallExecuteSequence here:

http://wixtoolset.org/documentation/manual/v3/xsd/wix/installexecutesequence.html

The screenshot below shows the location of these elements in the Product.wix file [Figure 6]

Figure 6

Custom Actions

Within the custom action project, you’ll have a new CustomActions class. In the CustomActions class define a method “GetArguementValues” which we have previously added to the “DllEntry” property in the product.wxs file. Here we get a “LIC” and “NAME” property through a Session object. A custom action can interact with an installing package through “Session objects”. The Session object controls the installation process by opening the installer, which contains the installation data. Finally show in a message box with two parameters [Figure 7].

Custom Action Class                                                             Figure 7

Pass Command Line Arguments to Wix Installer

You’ve most likely run .msi files simply by double-clicking them from Windows Explorer. However,you can also run an .msi file by typing the file name at the command line. The advantage of running from the command line is that you can pass parameters to the command.

Open a command prompt and ‘Run as administrator’. Figure [8]. To do this click the start button on Windows and search cmd, right click on command prompt and ‘Run as Administrator.

Run as Administrator

Figure 8

Using command line, we can run the .msi installer and pass parameter values which we define d in the Product.wxs. First go to the location where the  .msi file is saved. For this example it’s located in “C:\pro”. Then, using the command msiexec /i CustomActionSetUp.msi LIC=”xxxxxxxxxx” NAME=”davton”, as shown below, you can run the installer and pass the parameter values [Figure 9].

Command Line

Figure 9

When executing the command, it will open the install wizard and show the message box with the two property values being passed in the command line [Figure 10].

Command Line popup

Figure 10

Summary

This article provides information for creating a custom action in Wix, passing parameters to custom action functions and extracting parameters passed from an installer inside a custom action function.

Written by Tharaka Pathirana  May 2017

  • « Previous Page
  • Page 1
  • Page 2

Copyright © 2025 · Davton Limited

  • Home
  • About Davton
  • Blog
  • Privacy Policy